Continued from previous post…
The usual means of capturing drops is to release the drop from a dropper and use an electronic circuit to recognize when the drop is in motion, wait for a precise amount of time, and trigger the flash. The important thing is to have a reliable, repeatable method.
A photogate (“electric eye”) makes a good way of recognizing the drop’s presence. Such a mechanism involves a light source and a light-sensitive device. Common designs employ an (infrared) LED and a phototransistor, or photodiode, or cadmium-sulfide cell. HiViz.com has some designs to choose from; I have used one from the CMOS Cookbook by Don Lancaster.
The timing needs to be accurate to 1/2 millisecond (1/10 millisecond is preferred). Since an average fall time might be 1/2 second, the timing should be accurate to one part in a thousand, or 0.1%.
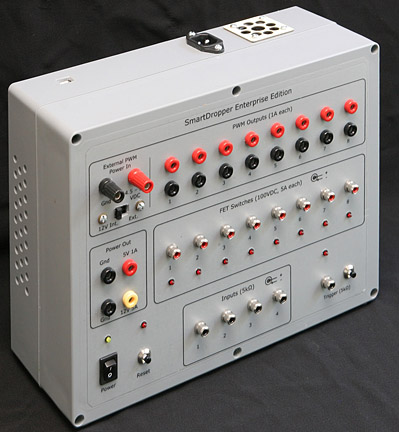
I have built my own timing and triggering devices (a few different ones, as I learned how to do it better.) Here is my most recent contraption:

It is overkill for anything I have needed to do, but I don’t worry about coming up short. And, I can use it for a variety of other things around the studio. It contains 10 microcontrollers programmed via USB. I created a graphical interface on a PC to configure it. It is accurate to one microsecond.
My experience is: if you want an electronics project that will take a lot of your time (unless you’re already an EE), then design and build your own. If you want to take pictures instead, purchase the equipment. Two sources are BMumford and WoodsElectronics. Both offer timing devices and various triggers. They may seem expensive, but if you value your time, they’re a bargain.
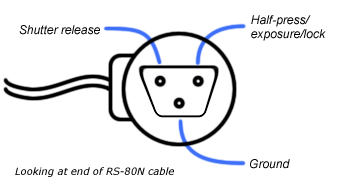
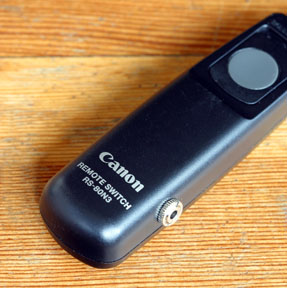
To control the camera electronically, I modified a RS-80N shutter release which I can control via a transistor. Here is the pinout for the RS-80N:

All that is needed to take a picture is to ground the shutter release pin. I added a 3/32″ stereo phono plug to the case so I can plug in my control cable when I want:

Next, The Liquids

I am a high school Commercial Photography teacher; I teach 3 2-hour classes every day to around 40 students from 27 high schools in Denver; I would like to learn how to do this and to purchase the equipment to show my students. Where do I buy this equipment and learn in order to teach my students? Our web site is: http://www.ccsd.k12.co.us/admin/acts/comm_photo/index.html and I would appreciate any direction on this. I am always trying to improve my curriculum. Thank you. Todd Adams 720-554-4563
Todd,
Yes, this kind of photography would be a fine teaching tool. It certainly involves many aspects of the subject.
I would suggest starting with shots of simple drops, since it requires essentially all the same photographic methods as the more complicated images that I do, but doesn’t require the more involved liquids handling techniques or as fast of a flash.
The simplest route to that end is probably the Time Machine by Bryan Mumford (http://www.bmumford.com/photo/camctlr.html). It will do the kind of timing necessary, and he offers a compatible photogate. He also has electronic cable releases for a variety of cameras.
Make magazine offers a kit that looks like it would be a reasonable choice, too (I have no experience with it). See http://www.makezine.com/flashkit/.
You can use a several different consumer flash units (typically the speedlite variety, not the studio variety), as long as the flash has a manual setting allowing 1/64th or 1/128th brightness.
Another good resource is Loren Winter’s site, http://www.hiviz.com. Loren is a high school teacher, as well, and has done some very creative work. The site has detailed descriptions and instructions on how to build equipment from scratch.
On a slightly different track, but potentially useful to you: I have a Java applet for visually learning about depth of field (http://www.liquidsculpture.com/dof.htm).
I hope this helps.
Martin
Hi Martin,
I was looking for RS-80N pinout and Google brought me to your page. BTW, you were only one in the list!!
I had a similar idea of having electronic sensors to trigger the camera in order to get an interesting shots,
for example triggered by light, sound, etc. I didn’t think about optocoupler, I see that it can be a lot of fun too!
Regards,
Alexander.
Hi Martin,
I like your photos and I very interesting in build a trigger circuit controled by PC. I’m thinking in a NI USB-6008 (http://sine.ni.com/nips/cds/view/p/lang/en/nid/14604). The input to the tarjet a light circuit similar to Loren Winter’s site, http://www.hiviz.com and the oupout to shutter the cam or the flash. The delay programed by the computer and a homeade software (LabView, Agilent HP-VEE or C). What do you think about this possibility?. Sorry for my Enghish.
Jose,
I have not used that National Instruments device, so I can’t make an informed comment. It does look like a possibility. It depends on how fine of control you want.
I like to have 1/10th millisecond accuracy. My concern with the model you mentioned (6008) is that it samples at 10 kS/sec. So, it doesn’t seem it could read an input and write back to an output within 1/10th millisecond. Perhaps I’m too picky. The 6009 model samples at 48 kS/sec, which would improve the response rate.
If you do go this route, please report back here as to how it worked. I think others will be interested.
Thanks Martin for your response,
The problem is the Ni-6009 cost, It costs twice as much as the NI-6008 (6008 149 euros, and the 6009 about 300 euros). I see that your equipment is controlled by PC, and they have microcontrolers. What kind of circuit do you using?
Thanks.
Jose,
Well, yes, it does cost more. 🙁
The difference between the National Instruments device and mine is where the control takes place. For theirs, the control is on the PC. With mine, the PC is used to configure the control box, the control is all done local to the box (once configured, it can run stand-alone.) So, I suffer no USB latency.
Jose,
(just to confuse matters a bit…)
Something else comes to mind: You can get simple USB-to-digital I/O modules that might work, and for a lot less. Look at: http://www.saelig.com/miva/merchant.mvc?Screen=PROD&Product_Code=IO043&Category_Code=UB
I can’t tell what the speed is, so you should investigate.
Another possibility (which has a custom driver, so it may be faster): http://www.accesio.com/go.cgi?p=../usb/usb-dio-32.html
And, there is also the possibility of using the parallel port on an old desktop.
Thanks Martin, the problem for me is to investigate if the speed of this modules is enough to work OK for this aplicattion….
Jose,
I have thought more about the USB-to-digital I/O solution. The problem is the USB latency. If the transfer mode is bulk transfer (which would be typical for any device that uses the virtual serial port interface), there is no latency guarantee. So, you have no control over how long it may take the PC to respond to an event.
Thus, the device needs to be using interrupt transfer mode, and then even with a high-speed USB 2.0 device, the minimum latency is 125 usec. I would guess that puts the read-respond turn-around time in the range of ½ msec.
In the end, the problem is that USB is truly a polling protocol, not interrupt-driven, and the polling cycle time restricts its real-time speed.
Martin,
Thanks for all your help and advice and I’m now totally hooked on drop photography. Thanks for the advice on the syphon as it works a treat. I wondered if you could offer any advice on how to get the drops to hit the peak of the previous drops. I’m getting lots of problems with waves in my bowl and it all gets very chaotic and just too random and splashy.
Cheers
Rob.
Rob,
If I understand correctly, your problem is that when you have a steady stream of drips running, it makes a mess of the surface of your pool. Then, you can’t get a proper splash to form.
The trick is to start the stream and catch just the first two drops. The first drop forms the splash and the second slams into it.
A simple solution is to hold a small cup under the stream until the surface of the pool calms down. Then yank the cup out of the way and catch the first two drops.
Hi Martin,
Thanks for the advice about the cup and I’m desperately trying to capture a splash on a splash but I just don’t seem to be able to capture one. Is there a certain drop rate you get a feeling for when you know that the collisions are going to occur? I just can’t seem to get the flow rate right! I’d appreaciate any help as I’ve lost my fingernails and I think my sanity is next! ;->
Cheers
Rob.
Rob,
If you still have your sanity, then you’ve just begun! 🙂
Yes, the drop rate is critical. Somewhere around 10 drops per second is a good place to start. Varying it slightly one way or the other changes the type of collision you’ll get. (In fact, there are many variables to fuss with: time between drops, height of the drops, surface tension, viscosity, etc., so it is hard to give an exact timing without specifying everything else.)
You can adjust the drop rate by varying the height of the siphon (the head).
Martin
Hi Martin,
Thank you for your fantastic work and sharing it with us. I know from experience how hard and inspiring that work is!
I have finaly managed to control the amount of drops by using a solenoid valve and the distance between drops by the height of the siphon.
Timing is controlled by a PC running Linux in single user mode to limit the amount of process switches to the minimum, using nanosleep();
Sigma 500DG Super at 1/64 or 1/128 as a flash.
I control camera, flash and valve through the parallel port, to avoid unpredictable USB delays.
I do not use a light port to catch the drop, just using the PC to time everything relative to the start of opening the valve.
I am not sure yet whether this timer resolution in practice is sufficient to get proper reproducable timing.
A first shot can be seen here:
http://www.eosdigitaal.nl/forum/viewtopic.php?t=48733
Do you have any comments on this set up?
What kind of post-processing do you apply?
Regards,
Lex
Hi Martin,
here are some more recent shots:
http://www.eosdigitaal.nl/forum/viewtopic.php?t=48849
This is still plain water.
Next is using die, soap, glycerine, other liquids…
I already found out that the resolution of nanosleep on Linux is 10 ms. I will have to go for busy-waiting I am afraid, or a microcontroller like you have, or FPGA like photopa (also cool work by the way).
Nevertheless, by adjusting the height of the valve and the timer
I can get some decent shots, though not yet the control that I want.
Lex
Hi Martin,
Meanwhile, I have greatly improved my control. Running Linux and using the 64 bit hardware clock cycle counter, my precision is over 1 microsecond. Since I use the parallel port for control, I can not go much higher than 1 MHz anyway.
I can now control the duration of a drop and the interval between drops with great precision.
Also, I now control the shutter of my camera (Canon 40D) from the PC, which allows me to open the shutter just before the flash is triggered. The advantage of this is that I have much shorter shutter times, therefore I can tolerate much more environmental light, which is important in these daylight saving time periods…
My latest pictures are here:
http://www.eosdigitaal.nl/forum/viewtopic.php?t=50008
Btw, I saw your Smirnoff shots, these are awesome!
You have given me much aspire too. I use your ART as inspiration. I made the same modification that you did to your canon 80N3 thank for the info. My Pic
http://www.flickr.com/photos/22244590@N03/
Looking great, Mark. Glad I could be of some help.
Martin
Pingback: bryan mumford