
I’ve been wanting to play with superhydrophobic (“very water hating”) surfaces for a couple years now, but haven’t found a source. Here’s a fun video done at CalTech.
How I Do What I Do – Overview
I often get requests for information about techniques. Here is the “stock reply” that I have been using to save me some time. Now I can just point people to this post!
Equipment
I don’t use special cameras or lenses, really. I am currently using a Canon 5D and a 180mm macro lens, but other equipment works, too.
High-Speed Tricks
I use fairly typical high-speed photography techniques.
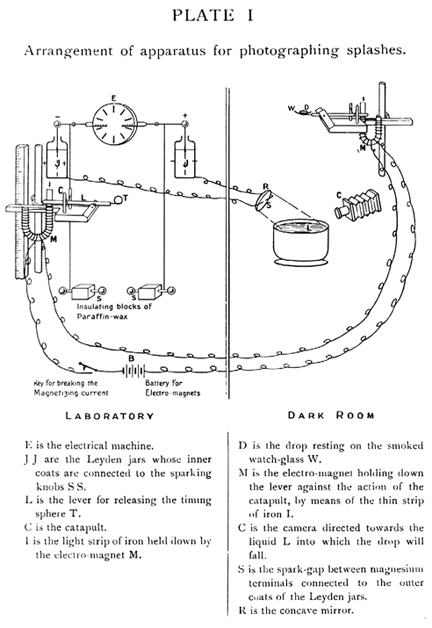
I leave the shutter open for a relatively long time (in a darkened room) and use a flash to illuminate the splash. The flash needs to be of a fairly short duration to stop the motion well. I use something like a 50 microsecond flash. “Speedlite” flashes (as opposed to studio strobes), control the amount light output by varying the flash duration. Not surprisingly, the shorter the duration, the less light (many studio strobes are the opposite!). So, you can get a short duration by setting the flash for low power (1/16 or 1/64). I get this by modifying the photo sensor circuit on Vivitar 285HV flash (a bit more detail) .
Timing the flash is done with a photogate and electronic timer. www.hiviz.com has techniques, equipment diagrams, and kits.
I have built my own timing and triggering devices (a few different ones, as I learned how to do it better.) My advice is: if you want an electronics project that will take a lot of your time (unless you’re already an EE), then design and build your own. If you want to take pictures instead, purchase the equipment. Here are some vendor choices: www.bmumford.com, www.woodselec.com, www.universaltimer.com, and www.cognisys-inc.com. And Make magazine has a kit: www.makezine.com/flashkit and www.quaketronics.com/flashkit.
The Light
It’s hard to give a single formula for lighting, since different situations lend themselves to different approaches, however, using an on-camera flash is not an arrangement that I prefer, especially for the clear liquids. Rather, I use remote flashes in various locations. In the end, lighting these shots is no different from any other similar material. The only difference is that I use a flash with a short duration to stop the motion. So, for clear liquids I use the same techniques as I would for glass, since they behave optically much the same. For an opaque liquid, like milk, I light it as I would for a white bowl (except smaller, of course.) A good book on lighting is “Light: Science and Magic”.
You will wrestle with depth of field issues. There are a few things you can do to help, but they all have their downsides.
The Liquids
The photography is in many ways the easier part of what I do. Handling the fluids is what takes the creativity and patience.
I have developed a fairly complex system of computer programs and hardware and mechanics that I use to create drops and do the timing. Still, I take a lot pictures and make a lot of mistakes. I have a post that goes into more detail on this, too.
Other resources
A simple setup is described in www.dpchallenge.com.
North Carolina School of Science and Mathematics
Andrew Davidhazy, at the Rochester Institute of Technology, has good information on high-speed techniques, as well as other fascinating types of photography.
Fotoopa.com has some creative techniques.
Harold “Doc” Edgerton, of course, is the father of the xenon flash tube and high-speed photography. Search for his books on Amazon.com.
Posted in Photography
17 Comments
Fooled Again
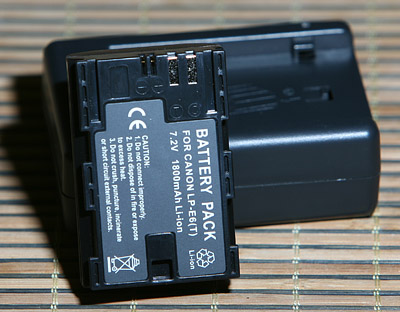
I recently purchased a Canon 5D Mk II. A fine camera it seems, and the added resolution will be helpful. One small issue is that Canon redesigned the battery. Well, times change and things progress, and we can always use better batteries. It uses the LP-E6 battery and the camera is not compatible with the good, old BP-511. Dang – the spare batteries I have for my old camera won’t work.
So, I’m in the market for a new spare battery. A brand new, Canon LP-E6 costs around $80 plus shipping. Ouch. But, I find a great deal: an LP-E6 plus a charger for $60 from USBattery.net (Uh-oh, that’s “.net” not “.com”) I order one.
Well, it turns out that it is not, as it states on my order confirmation, a Canon LP-E6. Rather, it is a replacement for the Canon LP-E6. Except that it is not compatible with the Canon charger. Nor is the new charger compatible with the real Canon battery, I presume. Great – I have two batteries that look pretty much the same, but require their own chargers. Any time I travel, I have to pack two chargers.
Oh, and every time I plug it into the camera, it tells me:
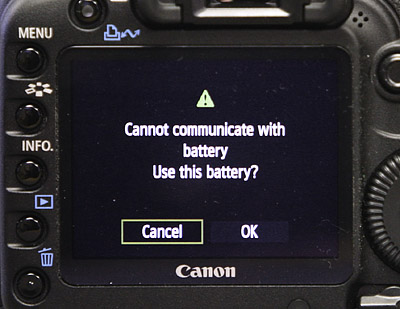
Sure, I can use the battery, but this message means that the camera can’t tell how much charge is left in the the battery. So, a fully charged battery appears to be dead, according to the camera.
What I have is a replacement for the Canon battery, except that it doesn’t work in the Canon charger, and it isn’t compatible with the camera.
Sigh. Silly me.
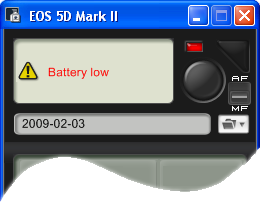
*Update*
When I tether the camera to my computer via USB, Canon’s EOS Utility software tells me that the the battery is low:
Posted in Photography, Uncategorized
4 Comments
“Time Warp” Experience
I realize that I haven’t written about my trip to Boston.
Last August, I was invited out to Boston to help on the set of Discovery Channel’s show, “Time Warp”. It was an opportunity to finally get some high-speed video of the kind of drop-on-a-splash collisions that I have been photographing for years, but have never seen in video. I jumped at it and I am very glad I did.
The crew was very hospitable, good humored, and accommodating. The host, Jeff Lieberman, and I share a number of interests, so we had a lot to talk about beyond the immediate task at hand. Jeff also told me that usually the segments are fairly tightly scripted, but in this case he convinced the director to just let us play while they filmed us. And, play we did.
We were on set for 10 hours, and then Jeff and I played for five more hours. There was a lot of footage that ended up on the cutting room floor, so to speak. What was most educational for me was seeing the relative speeds of the different stages of the collision. I had some sense of the variation, but seeing the complete collisions from start to end was still informative.
Shooting video is a bit different mindset than shooting stills since timing is not much of a issue. A lot of my electronic equipment was not necessary. The cameras we used were capturing at 10,000 fps w/HD quality, and would keep the most recent 2 seconds of data. So, I could fiddle around and when I saw something I liked, I just said “Stopâ€, and we had the last 2 seconds to cut from. Of course, it isn’t a dozen megapixels per frame.
The issue that is common between shooting video and stills is insufficient light. We were shooting at f/5.6 mostly, and even at that, we should have had more light. And, I wanted to be shooting at f/11 or f/16. For a back light, we used a bank of seven bulbs in a honeycomb pattern; each was 1500 watts, I believe. And we had a 7kW spotlight above. After a short while, the water was steaming and we were sweating. I hate to think what it would be like with enough hot lights to get another 2-4 stops of exposure.
All in all, I got everything I wanted out of the trip, and the resulting clip has been good to have around. It can be seen on YouTube.
Posted in Photography
6 Comments
Depth of Field Problems
Every now and then I get a question about managing depth of field in drop photographs. Indeed, it can be a bit frustrating.
Depth of field is a perennial problem with macro photography. It’s just the physics of it. The depth of field is shallower with higher magnification, so it makes little difference which lens you use, as long as you still magnify the same amount (I have a Java-based depth of field simulator where you can play around with these variables.)
There are three things you can do to get more depth of field; they all have their trade-offs:
- Use a smaller aperture – this requires more light and hazards loss of sharpness due to diffraction
- Back up some and crop – you will have a better depth of field, at the expense of resolution.
- Choose a camera with a smaller sensor – unfortunately, these usually have fewer pixels than a larger sensor, so again, you lose resolution, and they often don’t have as good of noise immunity.
It is often said (in fact, I just said it myself) that it makes no difference which lens you use as long as you use the same magnification. Well, this is a bit misleading. The mathematics are the same, but the visual effect is noticeably different. With a short lens, the background is not magnified as much as it is with a long lens, so it appears to be in better focus.
Having said all this, I often have to very carefully set my focus point (I use a macro slider to move the camera a bit closer or farther). It always seems to be a delicate balance.
On the other hand, a little bit of blurring toward the back does help give a sense of depth and even intimacy.
Posted in Photography
6 Comments
A Good Starter Kit
Andrew Davidhazy just pointed me to this kit for high-speed photography. It looks like a great way to get started for not a lot of money. The heart of the device is a microcontroller, so it has few parts and is extensible for the experimenter. It has both a sound sensor and a light sensor. The timing is not crystal-based, so it probably has only a 1% accuracy (I haven’t tested it so I don’t know this.) And it comes with a flash.
The flash is just a disposable camera that you hack into to use only the flash portion. It makes a nice, cheap way to get started. It isn’t particularly fast (1/1700 sec) and it won’t produce a lot of light. But, it will take high-speed photos of balloons popping and drops splashing (not a bullet cutting a card in half.)
For $125 it’s not a bad way to get started.
Posted in Photography
9 Comments
Will My Camera Work for Drop Pictures?
This is a question I frequently get. The short answer is, “Most likely it will.”
Most any camera will do. I use a an electronic circuit to trigger the camera, so I need one that has an electronic shutter release (most do). I use a variety of methods to create my Liquid Sculpture images, but in general, the technique is as follows:
- 1. Create the drop(s), somehow, knowing just when it is released, somehow.
2. Wait a specific amount of time.
3. Open the shutter.
4. Wait a bit more.
5. Trigger the flash.
6. Close the shutter.
7. Repeat ad nauseum.
I use a flash for all my lighting, and the high speed of the flash is what stops the motion. The shutter speed is not important – I usually use 1/100th second.
A person can instead use a fast shutter for some of this work, but I haven’t played with it much. Most modern cameras have a maximum shutter speed of 1/4000th or 1/8000th second. That is fast enough to stop many types of motion like single drop splashing. It won’t work very well for a popping balloon, or for the tiny droplets flying off from a splash. The fast moving parts will be blurred (which could be a desirable effect.)
One problem with using the shutter is the lag between triggering the shutter and the moment it opens – it isn’t truly deterministic. It may be 53 milliseconds on one shot and 54 on the next. That millisecond can be a large amount of time for some types of shots. My set up allows for 1/1,000,000 second accuracy, though I usually only work in 1/10,000 second increments.
Another problem is that focal plane shutters use a sliding window – a small slit moves across the film (CCD) surface. While each part of the film is exposed for only 1/8000th second, it actually takes 1/250th second for the slit to make its journey, so each part is exposed at a slightly different time. There are some clever ways to put this characteristic to use. In fact, Andrew Davidhazy at RIT has taken this to the extreme with his “strip camera”.
Posted in Photography, Uncategorized
22 Comments
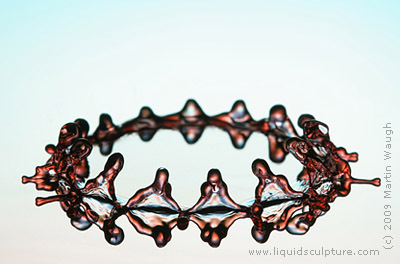
Water Drops Are Special
I suppose it’s obvious to many that water is a special substance. To recount a few of its properties that make it so:
-
It has the highest surface tension of any liquid except mercury.
-
It has one of the highest heat capacities of all materials.
-
It expands (floats) when it freezes.
-
It is a nearly universal solvent.
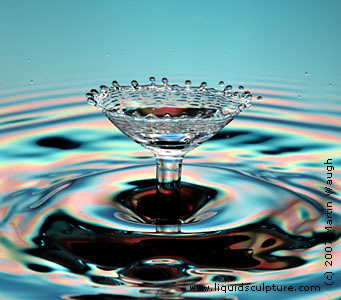
For my work with water drop photography, the surface tension is the most important of these, since when the volume of water is small, surface tension is by far the strongest force at work. This force is responsible for the marvelous splashes that are possible.
For example, when a drop splashes and forms a column, the diameter of that column is largely determined by the surface tension: the higher the tension, the larger diameter of the column, all other things being equal. Put a bit of soap in the water, and the column is quite thin and tall. Also, when the column falls back down, it “falls” 5 times faster than gravity would have it fall, because it is the surface tension pulling it downwards.
The other property of water that is important in determining the shape of water drop splashes is the viscosity. Water has a fairly low viscosity, especially warm water (I have to admit that I didn’t realize how much less viscous boiling water is that cold water – about 1/6 as viscous. When I learned this it made sense why I much more often splash hot water on myself – it really is splashier.) Sometimes I add glycerin to the water I use to increase its viscosity. It makes for a smoother, slower flowing liquid.
Posted in Photography, Uncategorized
24 Comments
Static Electricity from Water
Here is a fascinating, old device: Lord Kelvin’s water drop static electricity generator.
Here is a physics class demonstration of it.
Do my drops suffer from this distortion? Well, I don’t have such a generator built (yet), so I don’t have just this effect going on. But, I do believe that I see the shape of drops changing in response to static charge. I need to do some more experiments with this.
Posted in Uncategorized
3 Comments
A. M. Worthington – Simply brilliant
When people think of high-speed photography, the name that most often comes to mind is Harold “Doc” Edgerton. And rightly so, as he contributed so much to the discipline.
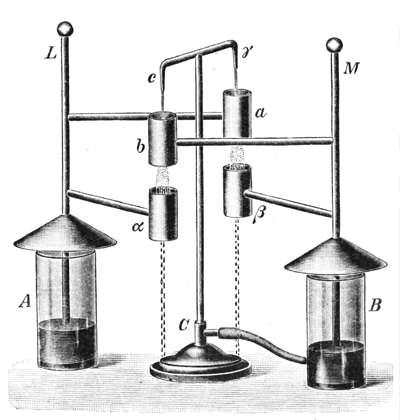
However, in 1876, A. M. Worthington wrote a paper entitled “A Second Paper on The Forms Assumed by Drops of Liquids falling vertically on a Horizontal Plate”; in 1908, he published a book, “A Study of Splashes,” which contained 300 photographs and drawings to supplement his narrative. He captured those images using high-speed photography. Doc was but five years old at the time.
The techniques that Worthington used were wonderfully simple:
He created a short burst of light with an open-air spark gap powered by Leyden jars (it was Doc that put inert gases and modern capacitors to work). The flash was triggered by an iron ball falling onto a pair of contacts. He timed the flash by having two identical mechanisms: one for dropping the iron ball, and one for dropping the droplet of water. By adjusting the heights of the two mechanisms, he could quite accurately determine the timing.
The dropping mechanism consisted of a spoon mounted horizontally on a pivot. It was spring-loaded and held horizontal by an electromagnet. When the electromagnet was de-energized, the spoon snapped downward, accelerating rather faster than gravity, and whatever was held in the bowl of the spoon had no place to go but down. The two electromagnets were driven by the same circuit, so they de-energized simultaneously.
He could create a drop of a predetermined size by adding as much water to the spoon as he wanted. The only tricky part was that the surface tension of the water caused the droplet to stick to the spoon. This was solved by coating the spoon’s inner surface with lamp-black – he simply held it over a candle for a bit. The powdered carbon surface supported the water without adhering to it. You can see the remnants of the soot in some of his photos.
As I consider the amount of compute power I use in my studio, I am humbled by what a clever man did a hundred and twenty years ago.
(diagram from “A Study of Splashes”, by A. M. Worthington)
Posted in Photography, Uncategorized
1 Comment