Personal Rant – Dead Car Batteries

Note to car manufacturers: I never want a dead car battery. Never. Ever.

Call me contrary, but I don’t want my wife and kids to walk out to the rainy parking lot after a movie and find that they need to jump-start the car.

We have two cars made in the past five years. They both sport a Dead-Battery feature.

One of our cars leaves the headlights on. Really. After over 100 years of designing cars, we can still kill a battery by leaving the headlights on. Now, I know that a car can be designed to turn the headlights off when the car is turned off, even delaying for a minute so I can find my way to the front door. I know this is possible because our other car, built by the same manufacturer (and a couple of years older) does this. But someone decided that on this car, the owner wants the option of killing the battery.

Our minivan has a reading lamp for almost every seat in the car. It’s great – almost like flying on a airplane. Even my kids can turn on their own reading lights. And, they can leave them on. Once the car is shut off, the lights stay on, until the battery goes dead.

The truly diabolical part of the design is this: the van has the courtesy of turning the interior lights on when a door is opened, and leaving those lights on for a while after you exit the car. So, you can’t tell if any of the reading lights have been left on unless you stand there and wait for all the other lights to turn off.

Why do I want this feature? I can’t ever remember thinking, “Gee, if only I could only remove my keys from the car, lock it, and walk away from an empty car to have the interior lights drain the battery.”

If I don’t want my car to start, I can open the hood and remove a battery cable. Of course, that isn’t very convenient. Perhaps the manufacturer could provide a switch that will keep me from starting my car without me having to pop the hood?

Posted in Uncategorized | 6 Comments

Apparatus – Mariotte Siphon

Once you try to produce a stream of drops at a steady rate, you begin to realize it isn’t as simple to do as it is to say. The temptation is to use a siphon or IV drip of some kind. The problem with these is that the amount of pressure behind the stream is dependent on the water level. As the level decreases, so does the pressure, and the rate of flow.

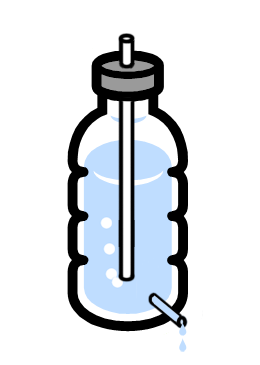
I ran across the solution to this a few years ago (having a degree in physics, I am ashamed to say that I didn’t know of it before). It is called the “Mariotte siphon”. It is well-known to people who do irrigation in rural areas, as a simple concrete box of this design can deliver a steady flow of water to a field. The basic diagram is:

Mariotte siphon
Mariotte Siphon

Cleverly simple and quite effective. The head (pressure) is dependent on the height between the bottom of the vertical tube and the final outlet of the liquid. The level of liquid in the bottle is irrelevant. I have built one using a soda bottle, a plastic drinking straw, and epoxy.

Posted in Photography | 20 Comments

Technique: Part 4 – Liquids

Continued from previous post

While it is a bit complicated getting the photographic equipment assembled, tested, and reliable, the true challenge is handling the liquids.

They are willfully non-linear.

It seems that everything in the world affects how they behave: viscosity, surface tension, density, temperature, the shape of the dropper, and what the cat had for dinner. Learning to control these variables is what demands the patience and creativity.

I use myriad arrangements to create the shapes: sometimes carefully placed beads of liquid on a flat surface, sometimes drops in free-fall, sometimes drops landing on a dry, flat surface, sometimes splashes of drops into a pool or with other drops, and sometimes multiple drops or splashes. And there are many things to be done with altering the physical properties of the liquids. I increase the viscosity with glycerin (because it doesn’t affect the surface tension much) I use dishwasher rinse aid to reduce the surface tension (because it doesn’t create bubbles, like soap does). Someone recently suggested Kodak Photo-Flo, instead, and it looks like a good choice. Food coloring works pretty well to add color. Aniline dyes are richer, but they affect the surface tension more than food coloring.

Propelled by the vicious cycle of serendipity and curiosity, I keep coming up with new things to try. And other people have plenty of ideas. The most intriguing so far has been the suggestion to try a high concentration of DNA in water. That would have never crossed my mind.

Posted in Photography | 17 Comments

Technique: Part 3 – Control

Continued from previous post

The usual means of capturing drops is to release the drop from a dropper and use an electronic circuit to recognize when the drop is in motion, wait for a precise amount of time, and trigger the flash. The important thing is to have a reliable, repeatable method.

A photogate (“electric eye”) makes a good way of recognizing the drop’s presence. Such a mechanism involves a light source and a light-sensitive device. Common designs employ an (infrared) LED and a phototransistor, or photodiode, or cadmium-sulfide cell. HiViz.com has some designs to choose from; I have used one from the CMOS Cookbook by Don Lancaster.

The timing needs to be accurate to 1/2 millisecond (1/10 millisecond is preferred). Since an average fall time might be 1/2 second, the timing should be accurate to one part in a thousand, or 0.1%.

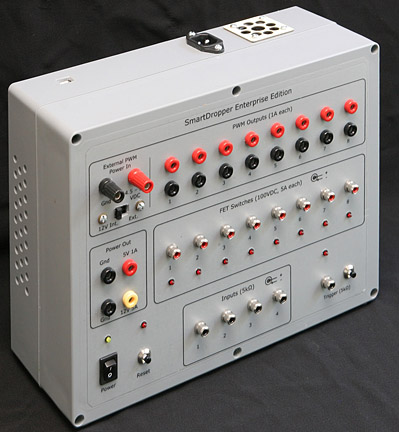
I have built my own timing and triggering devices (a few different ones, as I learned how to do it better.) Here is my most recent contraption:

Timing Contraption

It is overkill for anything I have needed to do, but I don’t worry about coming up short. And, I can use it for a variety of other things around the studio. It contains 10 microcontrollers programmed via USB. I created a graphical interface on a PC to configure it. It is accurate to one microsecond.

My experience is: if you want an electronics project that will take a lot of your time (unless you’re already an EE), then design and build your own. If you want to take pictures instead, purchase the equipment. Two sources are BMumford and WoodsElectronics. Both offer timing devices and various triggers. They may seem expensive, but if you value your time, they’re a bargain.

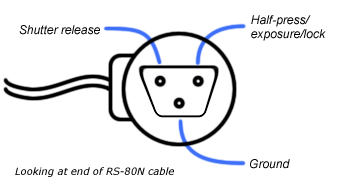
To control the camera electronically, I modified a RS-80N shutter release which I can control via a transistor. Here is the pinout for the RS-80N:

RS-80N Pinout

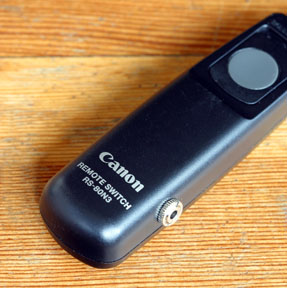
All that is needed to take a picture is to ground the shutter release pin. I added a 3/32″ stereo phono plug to the case so I can plug in my control cable when I want:

Modified RS-80N

Next, The Liquids

Posted in Photography | 20 Comments

Technique: Part 2 – The Light

Continued from previous post

I use fairly typical high-speed photography techniques:

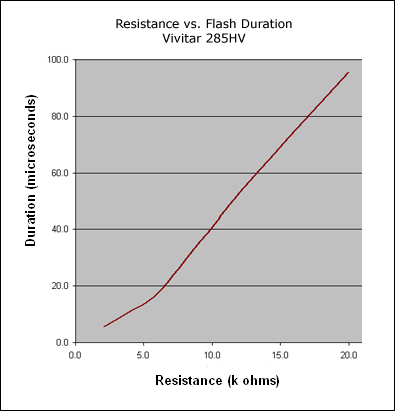
I leave the shutter open for a relatively long time (in a darkened room) and use a flash to illuminate the splash. The flash needs to be of a fairly short duration to stop the motion well. I use something like a 50 microsecond flash. I get this by modifying the photo sensor circuit on Vivitar 285HV flash. www.hiviz.com describes the technique (as well as the theory of xenon flash units). I replaced the photo sensor with a variable 20K ohm potentiometer so I can set the duration at will. Here is a graph showing the relationship between resistance and flash duration:

285HV Flash Duration

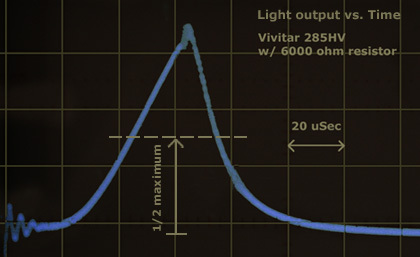
This graph doesn’t tell the whole story, though. The flash does not turn on and off instantaneously. Rather, it takes a bit to start, then ramps up and ramps down. Here is what it looks like:

Typical flash output at low power

What would you call the duration? Typically, people measure the width of the curve at the half of its maximum power. Here, it is about 30 microseconds. Also, notice that it takes about 45 microseconds from the time the flash is fired until it reaches one half its maximum. Individual units have their own signature, too. The maximum output varies some between units, as does the shape of the curve.

It is a balancing act to get well-lit photographs. On the one hand, a short duration flash is needed to stop the motion. On the other hand, with the close focusing distance, a fairly small aperture is desired to get a good depth of field. But, that requires more light. This can be solved with careful placement of the flash and, sometimes, multiple flashes.

A bright, constant light source (photolamp) and a fast shutter speed can also be used to stop the motion. This works reasonably well if the shutter is electronic (that is, the sensor is turned on and off electronically) rather than a mechanical focal plane shutter. The main issue with a mechanical shutter is that it is difficult to get it to release at the precise moment you’d like. There is always a bit of dither: sometimes it releases 50 milliseconds after it is triggered, sometimes 60 milliseconds, sometimes 54, etc. Another problem with the focal plane shutter is that even though it may be a 1/2000th of a second or shorter, it achieves this by sliding a narrow slit across the film plane, so each part of the frame is exposed at a different time over a 1/200th of a second (which might be used to good effect, but is not generally desirable). Finally, most cameras have still relatively slow shutters: 1/4000th of a second is 250 microseconds – five times as long as what I like to use.

Next, Control

Posted in Photography | 30 Comments

Technique: Part 1 – Camera & Lens

Several people have asked about the photographic techniques I use for my Liquid Sculpture images. Here are the basics:

  • Camera & lens
  • Light
  • Control
  • Liquids

Camera & Lens

I have only used digital cameras for this work. I learn from my mistakes, so I take tens of thousands of pictures. Without the immediate feedback of digital photography, my learning curve would left me an old man several times over.

I started with a Nikon 950, but, of course, it doesn’t have the resolution, options, and electronic controllability needed.

I have since used a variety of Canon digital SLRs: D60, 10D, 20D, and now the 5D. In some ways the 20D has been the best for this work. It has decent resolution, and the APS-C sensor gives a little more magnification with better depth of field.

I almost always use mirror lock-up because it makes the shutter lag much more repeatable. It might help with camera shake, but given the short exposure, I doubt it.

For a lens, I have used a 100mm macro, a 70-200mm zoom, and a 180mm macro. I like the 180mm: it gives me good working distance, smooth bokeh, and excellent optics. The camera is about 2-3 feet from the splash zone to get a reasonable field of view. For greater depth of field, I try to shoot at f/16, but I don’t often have enough light for that. I am usually one stop short.

Next: The Light

Posted in Photography | 1 Comment

The far reach of the web

A few months ago, I received email from a science teacher at an American School in Brazil. She explained that her 5th grade students were doing some science lessons about water and surface tension and such. She had seen my Liquid Sculpture site and asked if she could use some of the images in her class. Well, yes, that would be fine with me (having aspired through college to be a high-school science teacher, I was happy that my work would find its way into a school).

A couple of months later, I received a packet in the mail. The school had created a cross-disciplinary project for all 5th graders, based on my images. For science, they investigated the variety of shapes I generate. For art, each student was to choose one of my untitled images, and give it a name. Then, as part of communication skills, each wrote me a one-page letter telling me their title, and explaining why they chose it. The packet I received was 80 such letters bound in a notebook, each adorned with hand-drawn decorations around the border.

It sent chills up my spine and brought a tear to my eye. My work had touched the lives of dozens of developing young minds 10,000 miles away. And that touched me back.

Front cover of school project

Posted in Photography | 7 Comments